Key Takeaway
To design a relay control panel, start by identifying the requirements of the system. Determine the number of relays, inputs, and outputs needed to control the devices. Choose appropriate relays, such as electromechanical or solid-state, based on the application. Include essential components like circuit breakers, contactors, and timers for safety and functionality.
Plan the layout to ensure proper spacing and easy access to components. Create a wiring diagram to guide connections and avoid errors. Use a suitable enclosure that meets safety and environmental standards. After assembly, test the relay control panel thoroughly to verify functionality. A well-designed relay control panel ensures efficient, safe, and reliable operation for controlling electrical circuits.
Understanding the Basics of Relay Control Panel Design
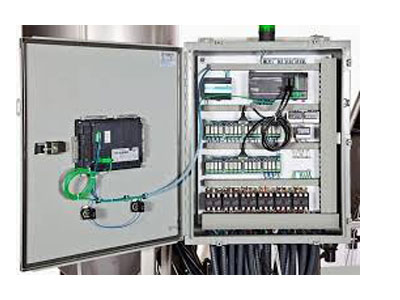
When designing a relay control panel, the first step is understanding the fundamental components and their roles. A relay control panel primarily consists of relays, power supplies, fuses, and other control devices like push buttons, switches, and indicators. Relays, which are electromechanical switches, serve as the core of the control panel, enabling automation and controlling higher-power devices.
The panel’s function is to provide centralized control for various devices. By energizing or de-energizing relays based on input signals, the control panel can perform tasks such as turning on motors, activating alarms, or opening and closing valves. The relay’s NO (Normally Open) and NC (Normally Closed) contacts are key in determining how the relay responds under different conditions.
The basic design must also ensure that there’s enough space for components, appropriate wire management, and cooling. Proper ventilation and a clear layout are crucial to prevent overheating and ensure easy access for maintenance and troubleshooting.
Selecting the Right Relays for Your Control Panel Design
The selection of relays is one of the most critical decisions in designing a relay control panel. Choosing the wrong relay can result in system failures or inefficient operation. To select the right relays, consider the following factors:
1. Voltage Rating
First, ensure that the relay can handle the voltage levels of the circuit it will control. For instance, if the relay is controlling a 24V circuit, make sure the relay’s coil and contact voltage ratings match this requirement.
2. Current Rating
The current rating of the relay should be sufficient to handle the load of the connected devices. If the relay is under-rated, it might cause overheating, while an over-rated relay can result in slower switching or unnecessary energy consumption.
3. Contact Configuration
Relays come with different contact configurations, including NO (Normally Open), NC (Normally Closed), and changeover contacts (COM). The configuration you select will depend on the specific application and the behavior you need from the relay. For instance, NO contacts are ideal when the circuit needs to be activated on relay energization, while NC contacts are used for circuits that require the relay to remain engaged when de-energized.
4. Environmental Considerations
Choose relays that are rated for the environmental conditions they will be exposed to. This includes factors such as temperature, humidity, and the presence of dust or corrosive elements. Sealed relays are often used in harsh environments to prevent contamination.
5. Coil Power
The coil power rating determines how much energy is required to operate the relay. Consider the power consumption of the relay to avoid unnecessary load on the control circuit.
Selecting the right relay involves balancing performance, reliability, and cost to meet the specific needs of the application.
Key Design Considerations for Wiring and Layout of Control Panels
Wiring and layout are crucial aspects of relay control panel design. Poor wiring or a cluttered layout can lead to inefficient operation, difficulty in troubleshooting, and potential hazards. Here are key considerations when designing the layout:
1. Component Arrangement
Plan the arrangement of components to minimize interference between high-voltage and low-voltage circuits. Ensure relays, power supplies, and other devices are spaced correctly to avoid overheating. Relays should be easily accessible for maintenance and testing.
2. Wire Routing
Use color-coded wires to clearly differentiate between power, control, and signal wires. Proper labeling of wires ensures easy identification during troubleshooting. Additionally, try to group wires logically to prevent tangles or damage.
3. Terminal Blocks
Terminal blocks should be used to connect wires from different sections of the panel. This ensures easy connection and disconnection during maintenance or troubleshooting. Marking each terminal block with clear labels will make the system more user-friendly and reduce the chances of errors.
4. Power Distribution
Ensure proper distribution of power across the relays. Use a busbar system to distribute power evenly and avoid overloading any one part of the circuit. The power supply should be capable of providing enough current for all relays and devices connected to the panel.
5. Grounding and Shielding
Proper grounding is essential for safety and preventing electromagnetic interference (EMI). Ensure that the relay control panel is correctly grounded according to local electrical standards. Shielding the control panel from electrical noise can improve reliability in sensitive applications.
By following these considerations, you ensure a well-organized and safe relay control panel layout that maximizes performance and simplifies future maintenance.
How to Ensure Compliance with Electrical Standards and Safety Regulations
Designing a relay control panel involves adhering to strict electrical standards and safety regulations to ensure the safety of operators and the reliability of the system. Regulatory standards vary by region, but here are general guidelines to follow:
1. IEC and UL Standards
Depending on the location, relay control panels should comply with international standards such as IEC 60204-1 (Safety of Machinery) and UL 508A (Industrial Control Panels). These standards dictate requirements for wiring, component placement, labeling, and testing to ensure the safety and reliability of control panels.
2. Voltage and Current Limits
Ensure that all components, including relays, wiring, and fuses, are rated for the voltage and current levels they will handle. This helps prevent overheating, electrical fires, and equipment damage. Overload protection through the use of fuses or circuit breakers is also crucial.
3. Safety Features
Incorporate emergency stop buttons, protective relays, and isolating switches into the design to ensure safety during normal and fault conditions. An emergency stop button provides a means to immediately disconnect power from the system in case of emergency.
4. Isolation and Lockout Procedures
Ensure the control panel is properly isolated during maintenance or repair. Incorporate lockout/tagout procedures to prevent accidental activation while maintenance work is being performed.
5. Documentation and Labeling
Label all components clearly, including relays, switches, fuses, and terminal blocks. Create a detailed schematic diagram for the control panel, showing wire connections, component locations, and circuit descriptions. This helps technicians and operators understand the control panel’s operation and simplifies troubleshooting.
Compliance with these standards ensures not only safety but also that the panel operates within the regulatory framework, which is essential for legal and insurance purposes.
Testing and Commissioning a Relay Control Panel for Optimal Performance
Once the relay control panel is designed and built, thorough testing and commissioning are required to verify the system’s functionality and ensure it performs optimally under operational conditions.
1. Visual Inspection
Before powering up the system, conduct a visual inspection of the entire panel to check for wiring errors, loose connections, or damaged components. Ensure all components are properly mounted and there are no sharp edges or exposed wires.
2. Continuity Testing
Use a multimeter to test for continuity in the wiring and relay contacts. This ensures that the control circuit is intact and that no wires are shorted or improperly connected.
3. Testing Relays and Controls
Once the panel is powered on, test each relay to ensure it activates and deactivates as intended. Use the manual override function, if available, to simulate control signals and verify correct relay operation.
4. Load Testing
After ensuring the relays respond correctly, conduct a load test to simulate normal operating conditions. Measure the current draw, voltage across contacts, and relay response times under load to ensure the system operates within safe parameters.
5. Performance Validation
Finally, test the entire control system under real-world conditions, ensuring all devices connected to the relays (motors, pumps, alarms, etc.) respond appropriately. Fine-tune any settings if needed, and ensure the system operates smoothly.
Conclusion
Designing a relay control panel involves careful planning, from selecting the right relays and components to ensuring compliance with safety standards. By following best practices for layout, wiring, and testing, you can create a reliable and efficient control panel that meets the needs of your application. Always ensure thorough testing and documentation to ensure long-term performance and safety in industrial systems.