Key Takeaway
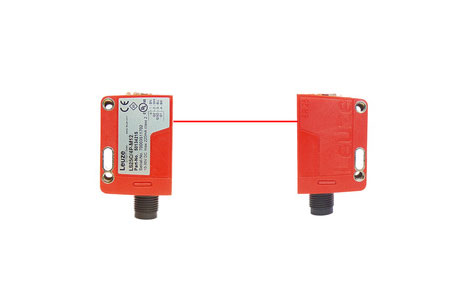
To install a photoelectric sensor, first ensure the power is off before connecting any wires. Follow the wiring guide provided by the manufacturer, usually connecting the brown wire to the positive terminal and the blue wire to the negative. Once connected, position the sensor so that the emitter and receiver are aligned, ensuring the detection beam is unobstructed.
After installation, test the sensor to verify proper operation. Make any necessary adjustments to the alignment and sensitivity to ensure accurate detection. Regular calibration helps maintain optimal performance.
Pre-Installation Checklist for Photoelectric Sensors
Before you begin the installation process, it’s important to ensure you have everything you need at your disposal. Failing to check off this list can lead to complications that may affect the sensor’s performance. First, make sure the power supply is compatible with the sensor’s requirements. Next, verify that the environment is free from excessive dust, moisture, or vibration that could affect the sensor’s functioning. Double-check the wiring diagram and have the necessary tools ready, such as screwdrivers and mounting brackets. Doing this prep work helps avoid any surprises during installation and guarantees that the sensor will work correctly from the start.
For example, in highly humid environments, choosing a sensor with IP ratings designed for moisture protection can make all the difference. Skipping these pre-installation steps could lead to frequent malfunctions or even sensor failure, costing more in downtime and repairs.

Step-by-Step Guide to Installing a Photoelectric Sensor
Before you even mount the sensor, proper preparation of the installation site is crucial. Ensure that the surface is stable and capable of holding the sensor in place without causing vibrations or displacement. Use the recommended hardware from the manufacturer to prevent any shifts during operation, as this can cause inaccuracies. Once the sensor is in place, route the wiring carefully, avoiding contact with sharp edges or high-power lines that could interfere with the signal. For sensors connected to a PLC or control system, double-check the wiring for correct color codes and ensure all connections are secure.
It’s important to power up the sensor after completing the wiring and installation. Turn it on to ensure it’s functioning correctly before final alignment. Correct orientation of the sensor head is also essential. It must face the area where the target object is expected to pass. Incorrect alignment at this stage can lead to false or missed detections. Remember, small errors in initial setup can cause significant issues later in the process, leading to downtime or malfunctions.
Best Practices for Aligning and Positioning the Sensor
Positioning and aligning a photoelectric sensor correctly is perhaps the most critical step for accurate detection. Sensors need to be aligned perpendicular to the object’s path for the best detection reliability. Through-beam sensors, in particular, require that the emitter and receiver are perfectly aligned. Even slight misalignment between these two components can lead to failed detection or false alarms, especially in fast-paced industrial environments where precision is key.
You should also account for nearby surfaces that could reflect light or trigger the sensor unnecessarily. Glossy surfaces might reflect the light emitted by the sensor, causing confusion. In such cases, either adjust the sensor’s angle slightly or use matte coatings to reduce reflections. It’s also a good idea to mount the sensor in a way that protects it from direct physical impacts, especially in high-traffic areas. These steps can significantly reduce wear and tear, prolonging the sensor’s operational life.
Common Mistakes to Avoid During Installation
A common mistake during installation is failing to account for the sensor’s operating distance. Each sensor has a specific range of operation, and installing it too far or too close to the target can severely impact performance. Always consult the manufacturer’s datasheet to ensure the sensor is installed within the optimal range. Misalignment, particularly for through-beam models, is another frequent error. The emitter and receiver must be perfectly aligned, or the sensor won’t function as intended. Regularly verify alignment during installation to avoid this issue.
Improper cable management can also cause problems, especially in environments with high electromagnetic interference (EMI). Make sure the sensor’s power and signal cables are routed separately to minimize interference. Additionally, avoid routing cables near high-power equipment, as this could introduce noise that might affect sensor performance. Taking the time to avoid these mistakes during installation can save significant downtime and costly repairs in the future.
Post-Installation Testing and Calibration Tips
Once the sensor is installed, thorough testing and calibration are essential to ensure reliable operation. Start by performing a basic test: check whether the sensor detects the target object as expected. If it doesn’t, revisit the wiring and alignment to ensure everything is in place. Many photoelectric sensors come with adjustable sensitivity settings, allowing you to fine-tune the sensor’s response according to the material and distance of the target. Adjusting these settings ensures that the sensor detects objects under varying conditions.
It’s crucial to test the sensor under real working conditions. If your environment experiences changes in lighting, temperature, or object speed, replicate these variables during the test. This gives you an accurate understanding of the sensor’s behavior in day-to-day operations. After calibration, mark the sensor’s position to facilitate easy reinstallation if it ever gets dislodged. Proper testing and calibration at this stage will reduce the need for frequent adjustments later on, ensuring smooth operations and fewer interruptions.
Conclusion
Installing a photoelectric sensor may seem straightforward, but a lot of care and precision are required to get it right. By following the pre-installation checklist, installing step by step, aligning the sensor properly, avoiding common mistakes, and thoroughly testing the setup, you ensure that your sensor will perform optimally for years to come. An expert-level installation process minimizes downtime, enhances efficiency, and ensures safety in industrial applications.
