Key Takeaway
To test a relay, you can follow these simple steps: First, listen for a clicking sound when the relay is energized, which indicates it’s operating. Next, check the condition of the relay contacts. Using a digital multimeter (DMM), measure the resistance between each pole of the relay and its corresponding Normally Closed (NC) and Normally Open (NO) contacts. For NC contacts, you should find infinite resistance when the relay is not energized, and for NO contacts, check for continuity when the relay is energized. These tests will help determine if the relay is functioning correctly or if it needs replacement.
Tools Needed for Testing a Relay
To effectively test a relay, you’ll need a few essential tools: a multimeter, a 12-volt battery, jumper wires, and a test light. This toolkit allows you to diagnose the functioning of both electromechanical and solid-state relays efficiently. The multimeter is crucial for measuring resistance, voltage, and sometimes continuity; the battery helps in powering the relay during the test; jumper wires are used to connect the relay’s pins to the power source and multimeter; and the test light will confirm whether the relay is triggering correctly. Having these tools at your disposal is the first step towards successful relay testing.
Step-by-Step Guide to Testing Electromechanical Relays
Testing an electromechanical relay involves several key steps:
Visual Inspection: Check the relay for any physical damage such as cracked cases, burnt contacts, or loose terminals.
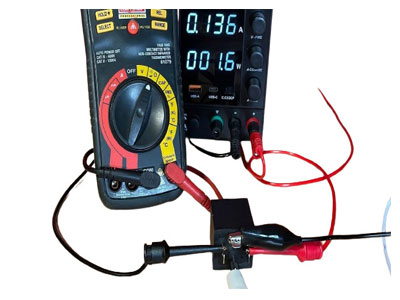
Coil Testing: Use a multimeter to measure the resistance across the coil terminals. A reading within the manufacturer’s specified range indicates a good coil.
Contact Testing: Apply voltage using the 12-volt battery and listen for a clicking sound, which shows the relay is activating. Use the test light or multimeter to verify that the contact is closing and opening properly.
Performance Check: Confirm that the relay is capable of handling its rated current without faltering.
You May Like to Read
How to Test Solid-State Relays
Testing solid-state relays (SSRs) requires a distinct approach, primarily due to their lack of mechanical components. Here’s a step-by-step guide to ensure your SSRs function flawlessly:
Resistance Check: Begin by measuring the resistance between the input and output terminals using a multimeter. High resistance is generally a good sign, indicating that the relay is off and blocking current flow as it should. This step is crucial for verifying the basic electrical integrity of the SSR.
Voltage Application: Next, apply the specified input voltage to the relay and observe the output. The SSR should switch from off to on without any hesitation. This immediate response is critical, as it reflects the relay’s ability to perform under working conditions.
Functionality Verification: Finally, repeatedly toggle the input signal to ensure the relay consistently switches on and off. This test checks the SSR’s reliability over multiple cycles, an essential factor for applications requiring frequent switching.
By following these steps, you can confidently assess the operational reliability of solid-state relays. This straightforward testing process not only helps in troubleshooting but also ensures that the SSRs you deploy in your projects will meet the rigorous demands of modern electronic systems. As a new engineer, mastering these testing techniques will equip you with the skills to maintain high standards of reliability in your designs.
Common Problems Detected During Relay Testing
When testing relays, several issues commonly emerge that can hinder their performance. Recognizing these problems early is crucial for maintaining system reliability. One frequent issue is stuck contacts, typically caused by dirt accumulation or mechanical wear. This malfunction prevents the relay from operating correctly, posing a significant risk to the connected systems.
Another common challenge is coil failure. Factors like overheating or general wear can alter the resistance values of the coil, making it inefficient or entirely inoperative. This type of failure can compromise the relay’s ability to function as expected, leading to potential system failures.
Additionally, shorted or open circuits within the relay can occur, disrupting normal operations. These faults may be due to manufacturing defects or environmental damage, such as exposure to excessive moisture or temperature fluctuations.
For you, as a newly joined engineer, understanding these issues and how to identify them through systematic testing is vital. It not only ensures the longevity and efficiency of the relays but also safeguards the broader systems they control. By staying vigilant and proactive in relay maintenance, you can help prevent larger system disruptions and maintain optimal operational standards.
Best Practices in Relay Testing and Maintenance
Ensuring the long-term reliability of relays requires a proactive approach to testing and maintenance. Here are some best practices that can help:
Regular Testing: Establish a routine testing schedule tailored to the relay’s usage and the environmental conditions it faces. Regular testing helps identify potential issues before they escalate into failures. For example, testing relays in a manufacturing setting might occur monthly, whereas in less demanding environments, a quarterly check might suffice.
Keep Records: Documentation is crucial. Maintain detailed records of each test and its outcomes. This data is invaluable for predicting potential relay failures and understanding their life cycles. By analyzing trends over time, you can make more informed decisions about when a relay might need preemptive maintenance or replacement.
Environmental Considerations: Adapt your maintenance strategy based on the operating environment. Temperature extremes, high humidity, and corrosive atmospheres can all degrade relay performance over time. For instance, relays operating in high-temperature conditions might require more frequent inspections or special types of lubrication to ensure optimal performance.
For new engineers, adopting these practices isn’t just about following procedures—it’s about developing a mindset that prioritizes diligence and foresight in equipment maintenance. This approach not only extends the lifespan of relays but also enhances the overall safety and efficiency of the systems they control.
Conclusion
Mastering the testing of relays ensures that you, as a newly joined engineer, can uphold system reliability and performance. Understanding the tools and techniques involved in relay testing empowers you to diagnose and resolve issues proactively, keeping the electrical systems you manage in top working condition. This knowledge is not just about fixing problems—it’s about preventing them, a crucial skill in any engineer’s toolkit.